Posts

Showing posts from September, 2020

Haunted house project part eight.

Image
Haunted House project part eight. The roof of my Haunted house is made from flattered corrugated cardboard. I used some that came in some recycle packaging. I painted this with white gesso leaving to dry added in places a rust colour acrylic paint, again leaving to dry. Then using an old paint brush I stippled thick black gesso to create a more rough texture . Once the paint was dry I rubbed over the roof with Tim Holtz distressed crayons, I used brown and white. I am really pleased with result! Looks like an old shed roof we used to have in our garden years ago!!! Just need to add some mosses!  I have also added some more boarding this time to my chimney. See part three on how to make planks of wood. Will post more soon, including lighting the house.

Haunted House Project part seven.

Image
Haunted House project part seven. As I am making this for Halloween I fancied some little pumpkins to go in my graveyard garden.🎃🎃🎃 So I glued together two Tim Holtz Idea-ology pumpkins on top of each other. The joy of these pumpkins are that Tim Holtz had already designed them to stack on top of each other and to accept inks, paints and dyes.  I used distressed crayons and distressed spray to make my pumpkin stack look dirty. I also added some faces with a fine black sharpie pen and a bit of railway scatter. For the stalk I used the top from a real tomato! I dried the stalks in the sun for a couple of days before using.  The little Haunted sign is also from the Tim Holtz Halloween Idea-ology range. I have just added some green distressed crayon over the lettering to give it that zombie swamp green look! 

Discovery of witchcraft

Image
While doing some research today into local witchcraft stories I found this interesting article about Reginald Scot's Discoverie of Witchcraft. The article is by Jennifer Reid dated November 2014. Please visit the link below.  Photo from article.  https://www.shakespeare.org.uk/explore-shakespeare/blogs/discoverie-witchcraft/

Haunted house project part Six.

Image
Haunted House project part six.  I have added little nail heads(dots of copper metallic pen) and also warning signs(white pen! Nice and simple! 🤣) Simple but I think just adding those little extra details adds to the spooky scenery!

Haunted house project part five!

Image
 Haunted House Project part five. I made the window glass from clear packing plastic (from a box of Nuvo drops) and coated on the plastic a layer of crackle as shown. This really helped to create an old rippled window effect. Also means you don't see straight through the back of the house.  For the boarded window I cut strips of paper from my sheet of wood(see previous posting). I glued on the strips or planks with pva. My next job is to add nail heads and paint the roof. 

Haunted house project part four!

Image
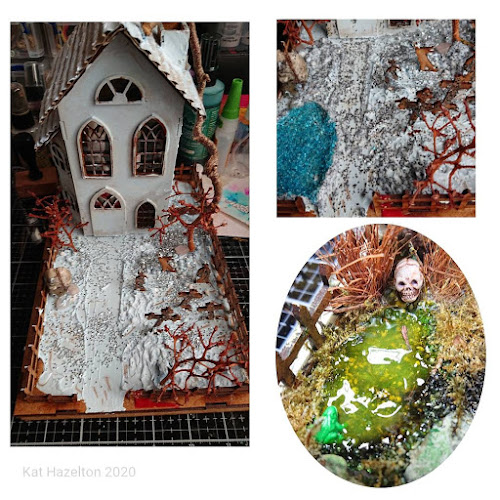
 Haunted house project part four. For the graveyard garden I added railway scatter. The path is shredded cork pieces. Both scatters were glue on using Mod Podge matt. After it dried I sprayed it with isopropyl spray followed by spraying a mixture of *Mod Podge and water. This helps to fix any loose scatter.  *the mod podge spray was one part Mod Podge to three parts water put in a spray bottle and mixed.

Haunted House project part three

Image
 Haunted house project part three. I wanted to make some planks of wood to border up one of my abandoned Haunted house windows. So taking white 300gsm card I scored by hand lines, also adding little knot holes for effect. I then added colour by using Tim Holtz Distressed crayons. I used tea dye, gathered twig, picket fence, pumice stone and  lack soot. By gently blending together it created a wonderful weathered wood effect.

Making a Haunted House part two

Image
  Haunted house project part two House and garden now covered in a nice coating of gesso. I added trees, made from dried grape stems, and a pond. The pond was made using modelling paste which I left to dry. I then added blue beads for texture and coated them in Tim Holtz Oxide ink to give it a slimey green colour. When dry I added clear Nuvo drops to make the pond look like it had water in it. I then added an old skull bead and a little plastic dolls house frog!

Making a miniature Haunted House on a budget part one.

Image
  I bought this Haunted House kit from Calico Craft Parts a while ago made a start and with one thing and another I never got round to finishing it. So this weekend I decided to restart the project. As I had already made up the house the first job was to add texture to the graveyard garden and add a base paint of gesso to the house as an undercoat.

Fab article on Witches

Image
  Whilst surfing about I found this fab article on Witches I just had to share with you. https://wanderingcrystal.com/witch-trials-in-england/