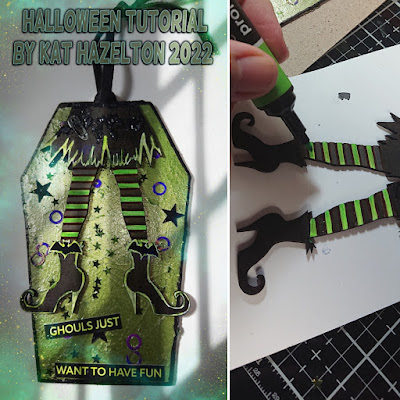
'Ghouls just want to have fun'! Halloween tag ornament tutorial by Kat Hazelton!
I love buying clothes from Killstar as not only are they beautiful but they come with these gorgeously Gothic tags which I keep and use for making into tags and hanging ornaments. You could use plain luggage tags or cut out a shapes from card
Firstly using a painting knife(spatula) I covered one side of the tag with Tonic Studios Glacier paste (Nuvo - Glacier Paste - Green Envy - 1902N). I then lightly sprinkled on some sequin stars and nail art circles. I then left this to dry over night.
The next thing I did was to colour in my Witches legs. I bought these from Calico Craft Parts. I used Posca pens but you can use Sharpies, pencils or Distress Crayons. On the areas I wanted neon green I did an undercoat of white first. Once the legs are fully coloured in and dry I positioned and glued them onto my tag.
Because I wanted to turn my tag into an ornament rather than using as a gift tag I glued on the plain side another identical tag with its design showing on the outside. To blend the theme of these two images together I coloured in the Skeleton twins with the same colour green pen. If you want to use yours as just a gift tag simply skip this part.
I hope you enjoyed my tutorial, I will be back again soon with more spooky ideas, tutorials, links and spooky stories. 😊
🦇🎃🕸️🕷️🦉👻🖤🦇🎃🕸️🕷️🦉👻
Links 🔗


