Revist...Making a Miniature Haunted House.
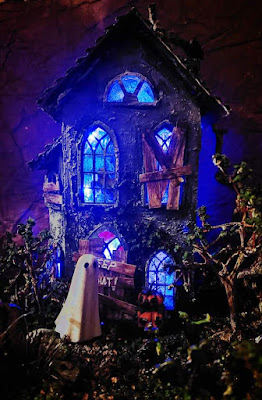 |
| Haunted House made by Kat Hazelton |
I thought this Witchy Wednesday it would be nice to revisit my Haunted House tutorial which I did way back in 2020. This project was originally done throughout September and October in over twelve blog postings. I have some requests to put them altogether into one posting so finally here it is. I have made a few alterations to update this tutorial but it is mostly in the spirit of the original.

Haunted House project part one.
I bought this Haunted House kit from Calico Craft Parts a while ago. I made a start putting it together but with one thing and another I never progressed any further with it. So this weekend I decided to restart the project.
I had already glued the house together so it was onto the interesting bit of texture and details. The the first job was to add a base paint of gesso to the house and add texture paste to the graveyard and garden.

Haunted house project part two
House was covered in a nice coating of gesso and the garden and graveyard had a generous layer of modelling paste. I then added trees. These were made from twigs from the garden and dried grape stems which were glued into place with super glue.
The pond was made using more sculpting paste. Once dry I added even layer of blue beads, this would give the pond a swamy texture. Once glued into place I used inks to give the pond it's slimy green colour and various browns colours around the surrounding area. When the inks dried I added a layer of clear Nuvo drops to make the pond look like it had water in it. You could use a resin mix or maybe a sheet of clear plastic.
For extra spookiness I added an porcelain skull bead and a little plastic frog which I bought many years ago at a dolls house fair.

Haunted House Project part three.
I wanted to make my haunted house look abandoned or in bad repair so I decided to make some planks of wood to cover some of the windows. To make planks of wood I used a sheet of white 300gsm card which I scored with lines and knot holes using a nail art tool.
To colour my card I used Tim Holtz Distressed crayons. I used a combination of tea dye, gathered twig, picket fence, pumice stone and black soot which I blending together with my fingers and a touch of water. This created a wonderful weathered effect.

Haunted House Project part four.
For the graveyard garden I added a variety of model railway scatter. The path is shredded cork pieces and the areas around the grave stones are grasses in various greens. Both types of scatters were glued on using Matt Mod Podge.
After it dried I sprayed it with isopropyl spray followed by spraying a mixture of *homemade fixing solution. This helps to fix any loose scatter.
*Fixing solution is one part Mod Podge to three parts water which you put in a spray bottle and shake to thoroughly mix.

Haunted House Project part five.
I wanted some of the window to have glass so I used some clear packing plastic. Once cut to the right shape and size I coated the plastic in a layer of crackle paste. This really helped to create the look of really old handmade glass windows.
For the boarded windows I cut strips of paper from my prepared sheet of wood. These I glued in place with pva glue.


Haunted House project part seven.
As I am making this for Halloween I fancied some little pumpkins to go in my graveyard garden. So I glued together two Tim Holtz Idea-ology pumpkins on top of each other. These fabulous pumpkins are designed to stack on top of each other and to accept inks, paints and dyes.
I used distressed crayons and distressed spray to make my pumpkin stack look dirty and glued on some railway scatter to blend them into my scenery. I also decided I wanted some faces so I added these with a fine black sharpie pen. For the stalk of the pumpkin I used the top from a real tomato! I dried the stalks in the sun for a couple of days before gluing into place.
The little Haunted sign is from the Tim Holtz Halloween Idea-ology range. I have just added some green distressed crayon over the lettering to give it a swampy green look!

Haunted House project part eight.
The roof of my Haunted house is made from flattered corrugated cardboard which I recycled from some packaging. I painted this with white gesso, leaving to thoroughly dry over night. Then I added a layer of rust acrylic paint once again leaving to thoroughly dry. Then using an old paint brush I stippled thick black gesso to create a rough texture .
Once the paint was again dry I rubbed over the roof with Tim Holtz distressed crayons, I used brown and white which helped to pick out the details. I am really pleased with result it looks like the old shed we used to have in our garden many years ago!!!
To finish off I added little bits of green moss!

Haunted House Project part nine
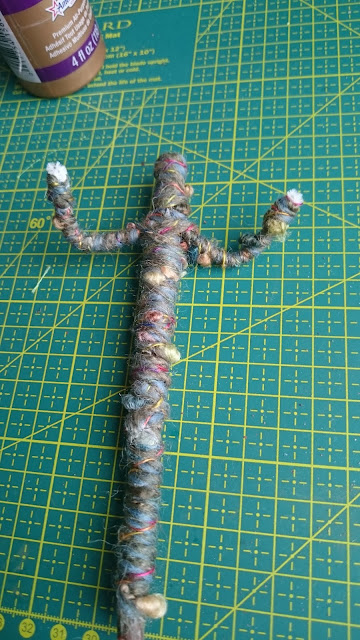
I felt my Haunted House needs some inhabitants! So today I am doing a gentle craft project, painting black Nuvo drops onto little mdf crows and bats! Really therapeutic
These will be glued onto black wires and dotted around the scene.

Haunted House Project part Ten.
To add a spooky green glow I added some green glow in the dark Nuvo drops to my trees and around the gravestones. Once dry these will be weather down with some acrylic paint so they don't show up so much during the day. I also highlighted my pumpkins facial features with some black Nuvo drops.
Hopefully this week I will be finishing off my project adding lights, birds and flying bats! 🦇

Haunted House Project part eleven.
I finally getting round to adding lights. I decided to use Tim Holtz Idea-ology Halloween lights as I loved the soft purple/blue ones for my project. There are other makes of mini light's on the market including some I spotted in Hobbycraft. They do a range of different styles and lengths and all battery operated.
I didn't want to stick them down permanently as I might want to change them for Christmas lights in December🎄. So I used a low tack washi tape. Looks a bit messy but this won't show from the front. Now for the final reveal!
👻👻👻👻👻👻👻👻👻👻👻

Haunted House Project part twelve.
My lights are now taped in my Haunted House! I must confess I really love these blue/purple lights! They give off quite a spooky glow!

My finished Haunted House with a spooky inhabitant!
I really enjoyed doing this Haunted House kit from Calico Craft Parts. Please visit their website for this kit and other Halloween mdf shapes.
http://www.calicocraftparts.co.uk/
I used a lot of Tim Holtz products in the decorating of this project. For more information on Tim Holtz ranges of craft supplies plus tutorials please visit.
 |
| Close up of windows showing planks and beautiful rippled effect glass. |
 |
| Haunted House is already inhabited! 👻👻👻👻👻👻👻👻👻👻👻👻👻👻👻 |
Back next week for more Witchy Wednesday postings.
🌿🌸🌿🌸🌿🌸🌿🌸🌿🌸🌿🌸🌿🌸🌿
I will from time to time post some links to spooky craft products, merchandise and other cool things on my blog. I do not get any financial gain from mentioning them I do it because I like to share information and show my support to businesses large and small. Please always check out the sellers before parting with your hard earned cash. I am not responsible for what happens beyond my blog! But I do hope you enjoy what I share and have fun with whatever goodies you buy.
The same applies to any links I post. I post them as I like to share what I find whilst researching witches and folklore. Please always check them out before reading or showing them to children. Some sites may contain adult content or might be just way too spooky especially for younger children!

